|
Ok,
I'm ready - Let's GO!
I
want to keep this modification as simple and easy to understand
as possible, so I won't get much into how/why this mod works,
Tom
Pabst explains it quite nicely. There are a couple of things
you need to do BEFORE you starting soldering your board so read
carefully.
Before
you do anything you will need to make sure you flash your Ultra/66
card's BIOS with the Fasttrack/66's found on Promise's
site. After your download is complete, place the unzipped
files onto a 3.5" floppy disk, and reboot your computer. To
complete the flash procedure you will need to make sure you
boot into a pure DOS environment, so before windows starts to
boot hold down the shift key, which should bring you to the
boot menu. Choose DOS prompt only. Now, you should be able to
flash your BIOS, I recommend making a back up of your current
Ultra/66 BIOS, just incase the modification doesn't work and
you want to get the old BIOS back. Once the BIOS update is complete
shut down your system and remove the card.
There
are a number of different ways to complete the modifications
needed, one of which is not only unbelievably simple, and fairly
safe, but is also rather professional looking. This particular
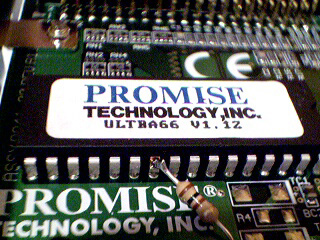
method involves making only one solder to the EPROM's pin #23
(pin #7 from the left, facing the PCI connector) to a ground,
effectively deactivating that pin in a sense. There are a number
of places you can ground the resistor, to the back plate is
one popular option, which is my opinion is a relatively crude
method. Rather I choose to ground it to a grounding surface
on the board itself. Here's a picture:

Note where the resistor touches the EPROM chip's #23 pin.
Remember
to be VERY careful when soldering around the EPROM, the BIOS
is extremely heat sensitive. You shouldn't have to solder around
the ground because after soldering the resistor onto the EPROM's
pin it should stay in place nicely, you'll want to try and do
as little soldering as possible.

This
method and a number of other methods are also listed over at
Ole
Pedersen's page. That page also has a good forum where you
can get help with any problems you may encounter while performing
this operation.
Finished
Once you have completed the necessary hardware modifications,
and the Fasttrack/66 boot loader appears, you're all set
to go.
Setting up the different RAID arrays themselves is not very
difficult as promise included a nice auto-setup feature
which
when selected will help you define an array with two or more
formatted HDs. Performing this simple mod will not only
offer
you a RAID controller on the cheap, but also give you a higher
sense of worth, and bragging rights which should help
you score
higher with the ladies … (yeah right).
by
Ryan Wissman
<<
Previous
|