|
On
this picture you can see the bezel (duh!), the covers for empty
drive bays, the buttons (reset and power) and a pack of wires
with the LEDs and switch attached. All that needs to be painted
in there is the bezel and drive covers. If you want to paint
your drives, you will need to make them suffer the same decapitation
treatment. I decided to paint my CD-ROM in black too. Since
it's getting pretty old anyway I'm not afraid of messing it
up. It probably only has a $10 resell value anyway.

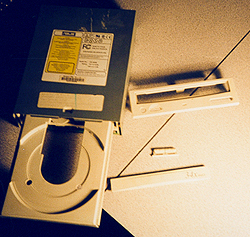
On
this image you can see the CD drive itself, the drive faceplate,
the face of the drawer and the little PLAY and FRW buttons witch
are in fact one piece of plastic, not two. All but the buttons
need to be spray-painted. In this case there is no screw at
all. Everything is held in place with clips. Most CD drives
are like this but some may require a screwdriver to take apart.
Other than that there is not much to do for preparation.
Some
sand the plastic pieces a little to get a more abrasive texture.
But if you have good paint it's not a necessity. If you do so,
use a smooth sand paper. And don't use any electric devices
since most of them are too aggressive for plastic.
Now,
let's get ready to start painting. Start by finding an adequate
place to paint, remember outside is not a good place. Wind,
animals and dust are all things you don't want your stuff to
come in contact with while drying. So pick some place inside.
Install your pieces above ground if possible; I used small plant
pots as pillars. Don't forget to place something underneath
them to protect the floor; old newspaper is perfect.
Next
>>
<<
Previous
|